| Resolution / Answer |  | NOTE ZDesigner Driver does not apply to Card Printers, and it is only for Zebra Label Printers. |
| NOTE
|
Finding and Installing Printer Drivers
- Visit the printer's support page.
- Search by Printer Model:
- Access printer's support page.
- Download Driver:
- Go to Downloads > Driver, select the driver, and click the download arrow.
Configuring Printer Settings
Procedure:
- Right-click on your printer in the Windows printer folder and select Printing Preferences.
- Select the Page Setup.
- Set Width and Height. Change units if needed.
- Select Media Type. For more information regarding your media, refer to Identify Type of Media.
Choose between labels with gaps, continuous labels, labels with black marks, or tags with side notches.
- Labels with gaps (using media with gaps, notches, or holes between labels to detect the top of the form).
- Continuous labels (using media without gaps, notches, and holes, or one continuous form).
- Labels with black marks (use media with black marks on the backside).
- Tags with side notches (using media with notches on the side).
- Click Rotation and select the image orientation (0° Portrait, 90° Landscape, 180° Portrait, 270° Landscape). You can check the image in the Print Preview in the right upper corner.
- If you flag the Mirror label box, you can modify the formatted image as if viewed in a mirror.
- If you flag Inverse, the label appears as white over black or black over white.
- To save the settings click the Apply and OK buttons on the bottom.
Print Options:
- Speed and Darkness: Adjust as needed, with recommended darkness set at 15 for new printers.
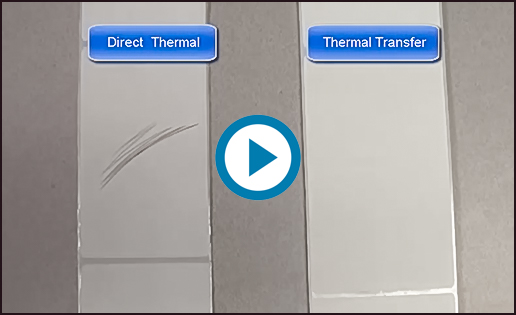
- Printing mode: Select between Thermal Transfer and Thermal Direct.
The video demonstrates how to differentiate between Thermal Transfer and Direct Thermal labels:
 - Offsets: Adjust top and left positions for image placement.
- Advanced Settings: Configure backfeed, pause settings, and more.
Pause:
- No Pause: Normal default setting.
- After Label: The printer will go into a Pause state requiring users, or system intervention, to print the next label.
- After Job: A Pause will occur after batch printing requiring users or system intervention to print the next label.
- After Interval: Sets the Pause state after the selected number of labels are printed.
Backfeed
- Default: Backfeeds before printing the label.
- No backfeed: Prevents backfeed after a label is printed.
- Before printing: The label backfeeds before it starts the next print cycle.
- After printing: The printer will backfeed immediately after printing a label.
- You can flag the box Cancel all current and queued printing documents to cancel the printing.
- You can also Enable passthrough mode if you flag the box.
- To save the settings click the Apply and OK buttons on the bottom.
Operation Modes:
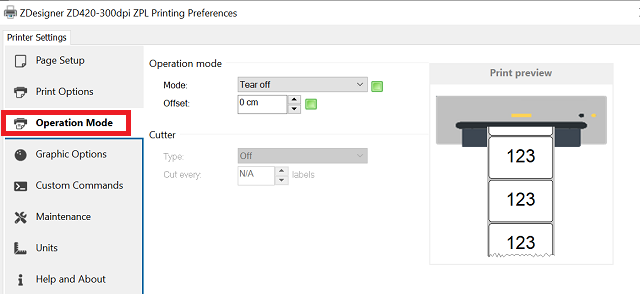
- Tear-Off: Gap or Notch will stop resting at the printer tear bar.
- Peel-Off: Used if the printer has a peel or label presentation sensor. The label will feed to the peel bar and hold the position until the label sensor detects the label was removed.
- Cutter: Sets the printer for the cut mode, cutting after each label is printed. Use the Group Quantity value along with Cutter to set the number of labels printed before the cut.
- Delayed cut: The printer waits for a delayed cut ZPL command (~JK) before it cuts the last printed label.
- Rewind: Eliminates the backfeed and is typically used when the printer has the Rewind Spindle Option.
Linerless media does not use the backing to keep the layers of labels on a roll from sticking to one another. It is wound like a roll of tape, with the sticky side of one layer in contact with the non-stick surface of the one below it. Individual labels may be separated by perforations, or they can be cut apart. Because there is no liner, more labels can potentially fit on a roll, cutting down the need to change media as often. Linerless media is considered an environmentally friendly option because no backing is wasted, and the cost per label can be considerably less than that of standard labels. The operational modes are:
- Linerless Peel: Additional to the Peel performance described above, the printer considers that the user has loaded Linerless Media (no wax backing paper) to the printer.
- Linerless Cut: Additional to the Cut performance, the printer considers that the user has loaded Linerless Media (no wax backing paper) to the printer.
- Linerless Delayed cut: In addition to the Delayed cut performance, the printer considers that the user has loaded Linerless Media (no wax backing paper) to the printer.
- Linerless Rewind: In addition to the Rewind performance, the printer considers that the user has loaded Linerless Media (no wax backing paper) to the printer.
- Linerless Tear: In addition to the Tear-Off performance, the printer considers that the user has loaded Linerless Media (no wax backing paper) to the printer.
- Applicator: For printers equipped with an applicator board to synchronize printing with control device signaling.
- To save the settings click the Apply and OK buttons on the bottom.
| NOTE The Linerless Media Tear-Off and Cutter options operate like the standard media printers. These options include an additional sensor to detect when a printed and presented label is taken from the printer. |
Graphic Options:
- Dithering: A common use of dither is converting a grayscale image to black and white such that the density of black dots in the new image approximates the average gray level in the original.
- Clipart: eliminates dithering, the printed image is darker.
- To save the settings click the Apply and OK buttons on the bottom.
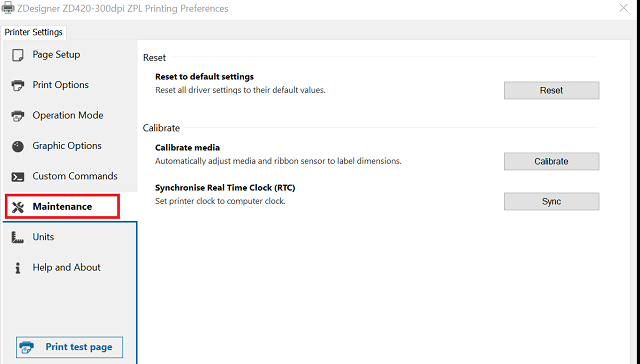
Maintenance Options:
- To default the printer > click the Reset to default settings button.
- To calibrate > click the Calibrate media button.
- To set the printer to the computer's clock > click the Synchronize Real-Time Clock (RTC) button.
- To save the settings click the Apply and OK buttons on the bottom.
- If you want to know the Driver Version, click the Help and About button
- After making your changes, select Apply.
Helpful Information:
|
|
|---|

