| Resolution / Answer | Procedure:On Device
- Setup Datawedge according to your needs.
- Export Datawedge settings:
- Select Applications.
- Select the Datawedge icon.
- Select the icon with the 3 squares on the top right corner of the screen to the right of DataWedge Profiles.
- Select settings.
- Select Export, you will see a message box open-labeled 'Export To .. ' to show the path of where the Datawedge.db (database) is exported to. You will be given 2 options ( paths ) to export the 'Datawege.db' file to. It is recommended to select the second option to export to 'Internal Storage' which is
- TC80 - '/storage/sdcard2/android/data/com.symbol.datawedge/files' location
- TC20 - '/storage/enterprise/android/data/com.symbol.datawedge/files' location
- TC51 - '/storage/emulated/0/android/data/com.symbol.datawedge/files' location
- Select the export button ..a message box will open stating that the file was Exported.
- Select ok.
- Select home button > programs.
- Select file explorer.
- Search for the locations listed above, you will see 'Datawedge.db'.
- Connect to the device with USB cable and copy the 'Datawedge.db' to your PC.
- You will need to setup StageNow to send this 'Datawedge.db' to the following location '/enterprise/device/settings/datawedge/autoimport' to import same settings to different devices using StageNow.
 | NOTE Please note you will not be able to view inside this folder as it has restricted access permissions. |
On PC
- Open StageNow on PC.
- Log in to Admin mode.
- Select create a new profile.
- Set MX to 4.4
 . . - Select 'Xpert mode'
 to create a new profile, select the 'Create' button. to create a new profile, select the 'Create' button. - Enter name of profile 'DatawedgeExport', select OK
- Select Deploy on top right.
 - Make sure settings is selected on the left.
 - Select the 'FileMgr' setting on the left.
 - Select the plus sign to add it to the profile.
 - Will see 'FileMgr' on the right under the deploy label.
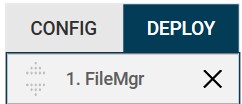
- Select add.
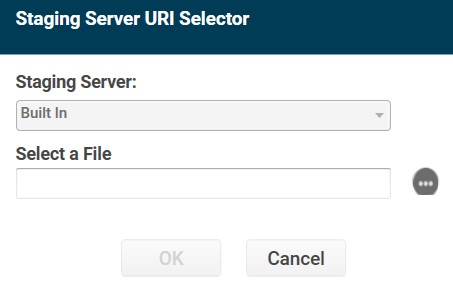
- Enter the path into the target field.
/enterprise/device/settings/datawedge/autoimport/datawedge.db 
- Select the circle with the 3 dots in the Source field to navigate to the 'database.db' file on your PC that you exported from your device.

- Selecting the circle will open this window in which you have to also select the circle with the 3 dots.
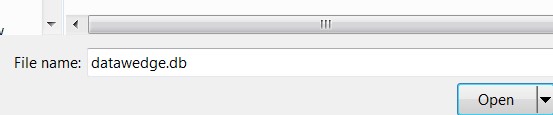
- Selecting the circle will open the navigation window to select the 'Datawedge.db' file.

- Select the 'Open' button, then OK.
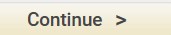
- Select the 'Continue' button.
 - Select the 'Complete Profile' button.
 - Select StageNow check box under Staging Client section.
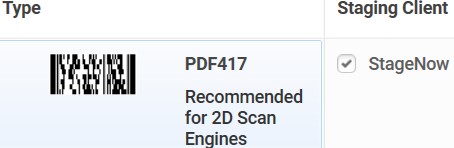
- Select the 'Test' button to generate a bar code.
 On Device On Device
- Go to: Desktop > Staging icon > StageNow icon > scan bar code to launch process.
- Once completed, press a power button and reset the device.
- Once TC80/20/51 boots up, you will see the profile added to DataWedge.
|
|
|---|

