GX Series Printer Setup Overview
The Zebra Printer can be used in various applications and must be properly configured to function with your media such as labels, tags, and ribbon (if used). In addition, you will be required to set the label size, print darkness, and print speed to optimize printing. The printer is typically configured from your host device using a driver, utility or software, or sending the printer's command language (
EPL or
ZPL). For most instances, you will need to connect the printer to your host device to set up and configure the printer. The GX Series printer also allows for a button flash sequence to configure darkness, print width, set defaults, and calibrate the labels. It should be noted that these configurations will be overwritten by any driver or application settings when you send your label request. Refer to:
Feed Button Modes.
Driver Considerations
 | IMPORTANT! If you are using a USB connection to the printer, install the driver before connecting the USB cable to the printer. |
Do you need the ZDesigner Driver? The ZDesigner Driver is used when a Windows Application requires a driver to print to the printer. (The driver converts the Windows Application output to the printer's language.) If you are using a Label Design Software from a non-Zebra vendor check with that vendor to see if they provide their own driver before installing and using the ZDesigner Driver. In addition, if you are using an application that directly outputs the printer's command language (EPL/ZPL) then
do not use a ZDesigner Driver. For these applications either send the label files directly to the printer or use a Generic Text Driver.
There are 5 sections in this article:
| IMPORTANT! All printer settings can be impacted by commands from a mismatched or misconfigured driver or software application. A printer that is functioning correctly after setup but fails or indicates an error after label requests are received is most likely affected by the host side misconfiguration of the driver or printer software settings. The host device that generates the printer commands for printing typically has a setup configuration that sends these as commands to the printer. Make sure all settings match the printer settings to avoid intermittent issues. |
 |
NOTE Printer Setup and Configuration
The GX-Series printer can be configured by your driver, host application, or a utility. In these examples, we will use the ZDesigner Driver to configure the printer. The configurations are sent when printing using the driver or printing the driver test page. If you are using a non-Zebra application or driver or label software determine the methods used to set these configurations and be aware the terminology for each setting in your environment may be different.
|
Understanding your mediaThe Zebra Printer supports the use of many types and shapes of labels or tags and knowing your media detail is important for proper configuration.
Here are the details you should know for printer media setup and configuration. For example, we are using the ZDesigner Driver to show the configuration selections for each topic discussed below.
| NOTE When using the ZDesigner Driver, the configurations are sent to the printer when you request to print a label. (For example, printing the Windows Test page will send the printer configurations). |
Media Related ConfigurationsThere are 3 selections for
Media Type (Tracking Mode):
- Default - Web Sensing
- Continuous - Web Sensing (gap)
- Mark Sensing (Black Mark)
If you are using media with an inter-label gap or a center hole, set the Tracking Mode for Web Sensing.
If you are using media with a black bar or mark, set the Tracking Mode for Mark Sensing.
There are 2 selections for
Print Method (Media Type):
- Default - Thermal Transfer (Using Ribbon)
- Direct Thermal (No Ribbon)
| NOTE The Print Method does not apply if your printer is a GX420D Direct Thermal only. There are no ribbon spindles or settings. |
There are 3 selections for
Print Mode:
- Default - Tear off
- Cutter
- Peel
This is related to the label presentation after printing and is limited to the options you have installed. The GX Series Printer supports Tear Off, Peel (Dispense Option Required), and Cutter (Cutter Option Required).
Refer to
Print Mode Details for more information.
Media LoadingThe media must be properly loaded for the Print Mode you intend to use.
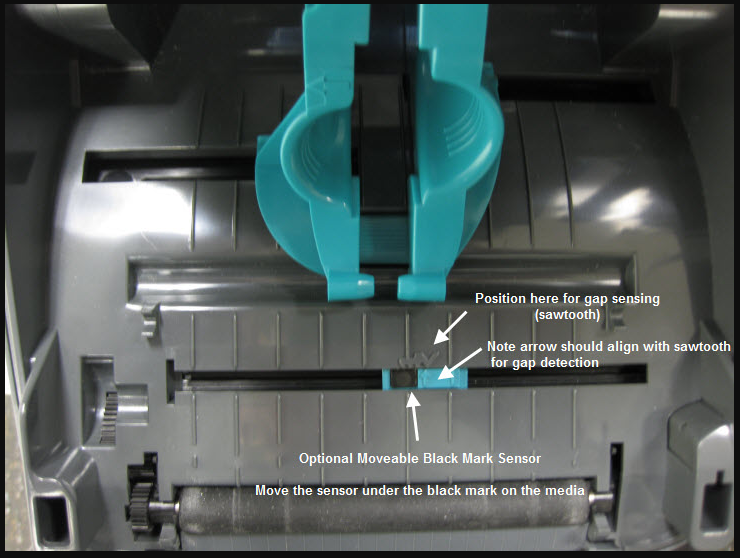
<TOP>Understanding the Media SensorsThe printer comes with sensors for label tracking based on the
Media Type used. There is a reflective and transmissive sensor positioned slightly off-centered in the media path. An optional adjustable black mark sensor is available. The sensor you will use requires configuration of the Tracking Mode (Mark/Web/Continuous) setting to function with the media you are using. A hole or black mark must pass over the media sensor's position to function correctly.
See the GX Series Printer Sensors:

Refer to the
User Guide: Moveable Blackline Sensor Option to see the GX Series optional adjustable black mark sensor.
| NOTE When using Gap Media the moveable sensor must be positioned with the sawtooth indicators aligned as shown in this picture:
 |
<TOP>Media feed power-up actionThe first time you load the media, you should run the 2 flash calibration procedures described in
Calibrate the printer for the Media. The Media Feed setting then determines how the media is handled when the printer is powered on or when the printhead is opened and closed.
The printer defaults to feed one label after power-up or when the printhead is opened and closed. This is intended to position an already calibrated label to its resting position to be ready for printing. This can be altered using the Media Feed setting to one of the following:
- Calibrate
- Feed (Default)
- Length
- No Motion
- Short Cal
If you wish to alter the default setting, you can create a file using the
^MF command to change the values. If you do not want to alter the printer defaults, you can use the two flash calibrations each time you change label lengths.
Refer to the Calibration below:
- Setting the Media Feed (Power Up Action) on the printer requires sending the ^MF command to alter the Power Up Head Open value. Refer to the ZDesigner Driver and the Send File Feature article on sending a file using the ZDesigner Tools feature.
Example of a ZPL Media Feed Command to Measure the Label Length when the head is closed:
^
XA^MFN,L^XZ (Power Up = no motion, Head Close = Measure the length)
^XA^JUS^XZ (Saves the value)
For recommendations on these selections, refer to
Media Feed (Power Up Action/Head Close Action).<TOP>Calibrate the printer for the mediaThe printer does not measure the label length unless the default Power Up or Head Close values are altered to either Length or Calibrate.
There are two calibration methods to consider if the labels fail to calibrate properly:
- The 2 Flash sequence will find the label gap and measure the label.
- The 7 button flash will perform a deeper analysis of the gap or mark and will produce a media sensor profile.
<TOP>
This applies to the GX420t and GX430t when using applications where the use of ribbon is required. This is referred to as Thermal Transfer printing where an inked ribbon is used to produce the image on the label.
Ribbon Basics This explains the ribbon types and typical darkness and speed selections. Refer to:
Ribbon Basics.
Ribbon Loading The ribbon must be on a core that has notches to assure the ribbon spindle hubs will move with the ribbon rotation. The printer uses a sensor to detect the Ribbon Out condition and depends on the reflective chrome trailer to sense the end of the ribbon.
See the ribbon sensor:
Failure to see this reflective trailer will result in the printer continuing to attempt to print. Refer to:
User Guide: Loading Transfer Ribbon.
Ribbon Configuration Selecting Thermal Transfer if you are using Ribbon, Direct Thermal if you are not using Ribbon.
<TOP>
Print quality is a product of proper printer setup and the use of compatible media for the application. The four impacting factors to consider are:
- The Media and Ribbon (if used) capabilities
Not all media is the same when it comes to being compatible with your application or needs. Printing speed, the durability of the image/media, environment are just a few factors to consider when determining the printer setup for the application. Trying to compensate for poor media compatibility by using high printhead pressure and/or darkness settings can impact your printer’s printhead life.
There are no printhead pressure adjustments on the GX Series printer. Assure the printhead properly latches and the platen is not worn as these are the impacting items when printhead pressure may be an issue.
The printer is capable of printing at multiple print speeds. The speed selection takes the media/ribbon (if used) compatibilities into consideration since if high Darkness settings are required to achieve acceptable print then slower rates should be used. If your application requires the highest print speeds available be sure your media supplier has recommended the correct media for your application.
Print Darkness (also may be referred to as Density or Burn Temperature) is a user-adjustable setting. Avoid overheating the ribbon as it can melt if set too high. Vary the darkness to produce the best print quality.
<TOP>
USBA Zebra-compatible driver must be installed
before connecting the printer. Refer to
USB Communications for more details.
SerialRS232 Null Modem is required and all parameters must be matched on the printer and host. Refer to:
User Guide: Serial Port Interface.
ParallelIf the printer has a parallel port, use an IEEE1284.4 compatible cable. Refer to:
User Guide: Connecting your Printer to a Computer.
Wired Ethernet NetworkPrinters that include a ZebraNet Print Server option can be connected to an Ethernet Network. If your network supports DHCP, the printer can obtain an IP Address when the cable is connected. Configuring a printer with the ZebraNet Option, refer to
ZebraNet Print Server - Install, Setup, Configure, and Troubleshoot on a Wired Network.
You can use one of the following Utilities to set specific parameters or set a permanent IP address for your printer queue:
<TOP>
Zebra printers are command interpretation engines using printer commands to define the printed images. The printer must receive the commands in the supported printer language such as
ZPL, EPL, CPCL. The printer will not respond if the label format received does not contain the required programming commands for label printing. Programming commands can be entered into a file and communicated to the printer, received as an output through a driver from an application, or created using one of many Zebra Label Software packages on the market.
For a general overview of this information, refer to
Label Format Creation.<TOP>Utilities and DriversIf you are not using the ZDesigner Driver for your printing application you can use one of the following utilities for printer configuration. If you are using a non-Zebra application or driver consult with the vendor for details on printer setup and configuration.
<TOP>Helpful Information:
<TOP>
