 | IMPORTANT! All printer settings can be impacted by commands from a mismatched or misconfigured driver or software application. A printer is functioning fine after setup but fails or indicates an error after receiving label requests, most likely affected by the host side's misconfiguration of the driver or printer software settings. The host device that generates the printer commands for printing typically has printing specifications sent as commands to the printer. Make sure all settings match the printer settings to avoid intermittent issues. |
 | NOTE ZDesigner Driver does not apply to Card Printers and it is only for Zebra Label Printers. |
- Find your printer in your Windows printer folder, select the printer and click Properties.
- Click the Advanced tab, then click the Printing Defaults button.
- Click OK.
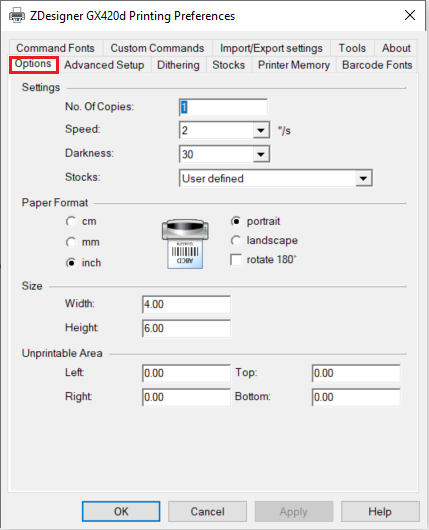
- From the Options tab, you can set the printer's Speed, Darkness, Stocks, Paper Format, Image Orientation and Unprintable Area.
- Select the Advanced Setup tab to view additional settings. Here you can change the Media Settings, Device Options, Position Adjustment, and Cutter Options:
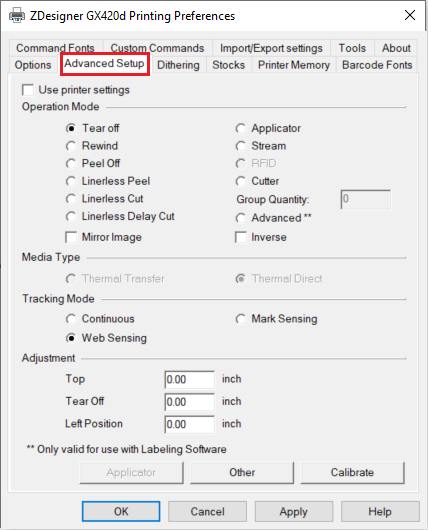
Use printer settings - check this box if you are manually configuring a printer via the LCD or sending a one-time configuration file to the printer and do not want to use the driver configuration.
Operation Mode
- Tear Off: Gap or Notch will stop resting at the printer tear bar.
- Rewind: Eliminates the backfeed.
- Peel-Off: Used if the printer has a peel or label presentation sensor. The label will feed to the peel bar and hold the position until the label sensor detects the label was removed.
- Applicator: For printers equipped with an applicator board to synchronize printing with control device signaling.
- Cutter: Sets the printer for cut mode cutting after each label is printed. Use the Group Quantity value along with Cutter to set several labels printed before the cut.
- Stream: Introduced for the ZE500 print engine: Limits backfeed to the first printed label. The second label will have started printing before the first label stops but will not complete its print until the next Start Print signal or pulse is received.
- Mirror Image: Modifies the formatted image to print as if viewed in a mirror.
- Advanced**: This option is disabled.
- Inverse: Allows a field to appear as white over black or black over white.
Media Type
- Thermal Transfer: Printing with ribbon on thermal transfer paper.
- Thermal Direct: Printing on heat-sensitive paper (no ribbon used).
Tracking Mode
- Continuous: Using media or one continuous form (no gaps, notches, black marks for the top of form detection).
- Mark Sensing: Using media that has a black mark for top of form detection.
- Web Sensing: Using media that has gaps between labels, notch, or a hole to detect the top of the form.
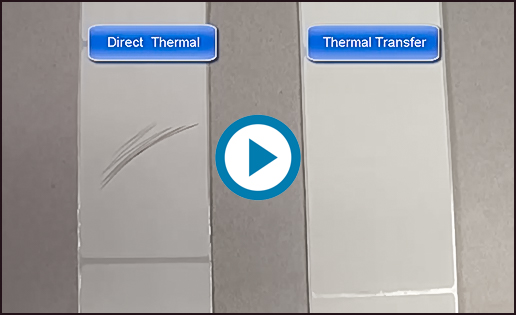
To identify your Media Type and Tracking Mode, refer to the article Identify Type of Media and watch the Video below.
Adjustments
- Top: This modifies the default vertical image start position to compensate for differences between the printer top of the form.
| NOTE If you are using multiple printers, it is recommended to adjust the Top for individual printers to account for tolerances associated with printer variance. |
- Tear Off: This modifies the resting position of the label to allow user adjustment of the gap over the tear bar or the cut location of the cutter function.
- Left Position: This modifies the horizontal position of the image placement. (left or right position when viewing the label after printing).
The Other tab contains the following features:
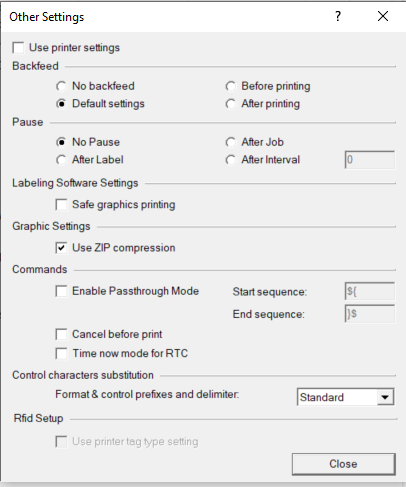
Use printer settings - Check this box if you are manually configuring a printer via the LCD or sending a one-time configuration file to the printer and if you do not want to use the driver configuration.
Backfeed
- No backfeed: Prevents backfeed after a label is printed.
| NOTE This will result in a (~ 1/2") non-printable lead edge on the following label. |
- Default Setting: There will be a backfeed based on the printer defaults.
- Before Printing: The backfeed will occur when a label format is received and the printer starts the printing cycle.
| NOTE This is useful if curling or label jamming occurs after the printer is resting for extended periods. |
- After printing: The printer will backfeed immediately after printing a label.
Pause
- No Pause: Normal default setting.
- After Label: The printer will go into a Pause state requiring users or system intervention to print the next label.
- After Job: A Pause will occur after batch printing requiring users or system intervention to print the next label.
- After Interval: Sets the Pause state after the selected number of labels are printed.
Labeling Software Settings
- Safe graphics printing: The graphic in a batch is downloaded for each label. Prevents missing graphics if a partial job is held in the queue while the printer is powered off.
Graphic Settings
- Use ZIP compression: This allows graphic compression.
Commands
- Enable Passthrough Mode: Allows text insertion by using the Start and End sequence to identify data to pass without driver processing.
- Cancel Before Print: Sends ~JA as the first command in the ZPL file canceling all format commands in the buffer and any batches that are printing.
- Time Now Mode for RTC: Controls the parameter of the SL command.
Checked sends ^SLT
T = Time Now Mode. This is the time that is read from the Real-Time Clock when the label to be printed is placed in the print queue. Time Now is similar to a serialized time or date field.
Unchecked sends ^SL0
Numeric Value = With the Enhanced Real-Time Clock (V60.13.0.10 or later) a time accuracy tolerance can be specified. 0 = one-second tolerance.
Control Characters Substitution
- Format and control prefixes and delimiter.
After making your changes, select Apply.
Helpful Information:

