| Resolution / Answer | Factory Reset Protection Warning
 | CAUTION A Factory or Enterprise reset can result in Google Factory Reset Protection (FRP) locking a device, requiring the device's Google account credentials to be active before the reset is entered.
- For Android versions 5.1. 6. and 7.1.1 (Lollipop, Marshmallow, Nougat) FRP can occur when a Google account is still active on the device before reset.
- For Android 8.1 or later, the FRP occurs only if both a Google Account and a Lock screen Password or Pin are active. After the device is reset and connected to the Internet, the screen lock pin or password will be required to continue.
|
Factory Reset
Performing a Factory Reset erases all data in the /data and /enterprise partitions in the internal storage and clears all device settings. After a factory reset is performed, your device returns to the default setting or the last installed operating system image. Reinstall the operating system image to revert to the previous operating system version.
Here are the three options:
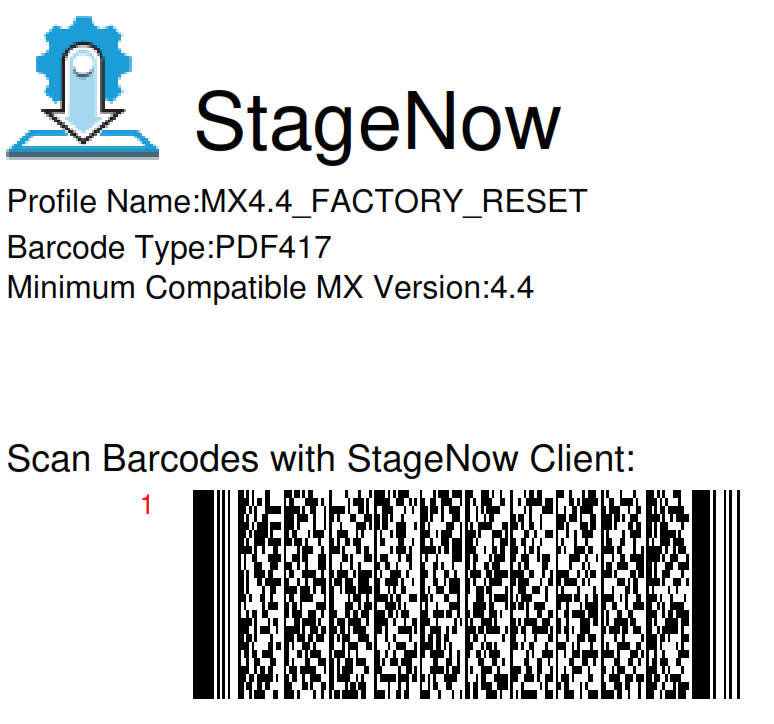
Option 1: Using StageNow - (XML-based 2D barcode)
Scan the below 2D Factory Reset barcode using the StageNow client (pre-installed).
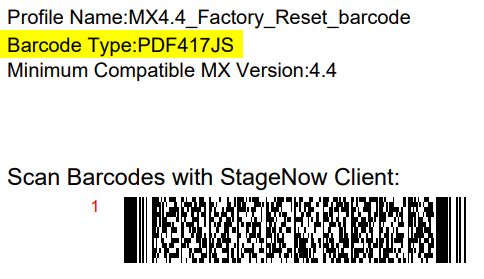
Option 2: Using StageNow - (JavaScript-based 2D barcode)
On devices running Android 13 and higher, scanning of XML-based barcodes for device staging is not supported; hence, use the JavaScript-based barcode below instead.
Option 3: Using StageNow - (XML-based 1D barcode)
Print the barcode below for devices with the 1D laser scanners, then scan it using the StageNow client (pre-installed).

Option 4: Using the ADB (Android Debug Bridge) Method
- Unlock your Zebra Android device and navigate to:
- For Android 10 and older except Oreo (8.x), use the following steps: Navigate to Settings > About phone (or About device).
- For Oreo (8.x), use the following steps:
Navigate to Settings > System > About phone.
- Locate the Build number and tap it seven times until the dialog box message appears: "You are now a developer!"
- Go back and perform the following steps:
- For Oreo (8.x) and older: Look for Developer options.
- For Pie (9.x) and Android 10: Select System > Expand Advanced.
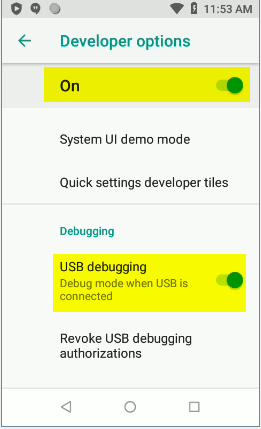
- Turn On the Developer options, then enable the USB debugging option.
 - Connect the Android device to your Windows PC (host computer). Refer to your device Accessories Guide for the required device cradle and cable.
- Open the Command Prompt (cmd.exe), change the directory to the Android Debug Bridge executable (adb.exe) location, and run the command adb.devices. Refer to the screenshot below.

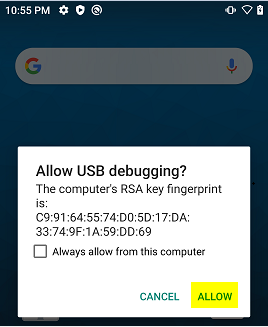
- The device will prompt for authorization (Allow USB debugging?). Tap Allow to enable access.
 After it is authorized, you can type in the adb devices. It will display the <Serial Number> device. Please take a look at the screenshot below. 
- Type in the following command:
adb reboot recovery
Your device will reboot to the Android Recovery screen.
- If your device is locked or unable to go to Settings, you can enter the Android Recovery screen by following these steps:
 | NOTE: Please refer to the device's product guide for further details. |
- Restart the device.
- Press and hold the device-specific button/ trigger. See the buttons based on your device below:
- EC50: PTT button.
- MC2200 and MC2700: P1 button.
- MC3300x and MC3300xR: Pistol Grip Trigger (GUN type) or the Right-Scan button (BRICK type). Refer to this article: Enter Android Recovery for Pistol Grip and Brick MC33 Devices.
- MC9300, MC9400 and MC9450: Pistol Grip Trigger.
- PS20: Insert the Terminal Reboot Tool (part number KT-MC18-REBOOT-05) into the power connector. Press and hold the Scan button until the display powers off (the device reboots). Refer to this article: PS20 - Enter Recovery Mode.
- TC20, TC21, TC22, TC25, TC26, TC27, TC5x, TC7x, ET60 and ET65: PTT button.
- VC80x: + button.
- VC8300 8" Blue button, VC8300 10" Blue and Brightness+ buttons.
- WT6000, WT6300 and WT6400: P1 button.
- ET40, ET45, ET51, ET56 and KC50: Volume Up (Vol+) button.
- ET60 and ET65: P3
- L10: Rotate Screen button (OREO) or Volume Up (Vol+) button (Android 10).
- CC600 and CC6000: Number 1 button. Refer to this article: CC600/CC6000: Enter Recovery Mode.
- WS50: Left button.
- The Android Recovery screen will appear.
- To navigate to Apply upgrade from the ADB option, press the device-specific button or trigger:
- EC30, EC50, KC50, TC20, TC21, TC22, TC25, TC26, TC27, TC5x, TC7x,TC8000, TC8300, VC80x, ET51, ET56, L10, ET40, ET45, ET60 and ET65: Volume Up (Vol+) and Volume Down (Vol-) buttons.
- MC2200, MC2700, MC3300x, MC3300xR, MC9300, MC9400, MC9450 and VC8300: Up and Down arrow keys.
- PS20: Use touchscreen.
- WT6000, WT6300 and WT6400: P1 and P2 buttons.
- CC600 and CC6000: Number 2 button.
- WS50: Left and Right buttons.
- To select Apply upgrade from the ADB option, press the device-specific button or trigger:
- EC30, EC50, KC50, TC21, TC22, TC26, TC27, TC5x, TC7x, TC8000, TC8300, VC80x, ET51, ET56, L10, ET40, ET45, ET60 and ET65: The Power button.
- MC2200, MC2700, MC3300x, MC3300xR, MC9300, MC9400, MC9450 and VC8300: Enter button or Power button.
- PS20: Scan button.
- WT6000, WT6300 and WT6400: P3 button.
- CC600 and CC6000: Number 1 button.
- WS50: Press and hold the Left or Right button, then let go.
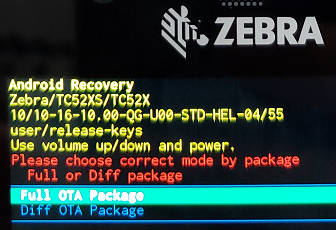
- For SD660 platform devices (Oreo, 10), you will be prompted to select the Full OTA Package or Diff OTA Package. Select the Full OTA Package.
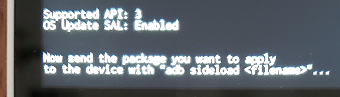
 - At this point, the Android device is now waiting for the package. This is the Factory Reset .zip file.
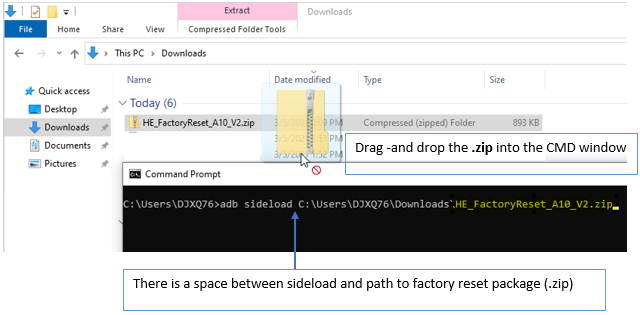
 - On your Windows PC, type adb sideload and add a space.
- Drag and drop the Factory Reset package (.zip) file into the CMD window.
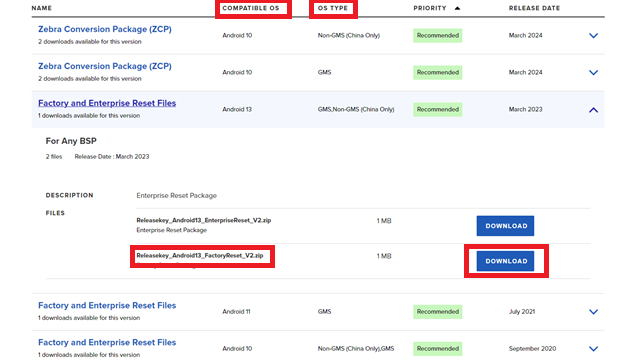
| NOTE: Download the Factory Reset package (.zip) file from Zebra: Support and Downloads for your specific model. On your device's support page, navigate to the Downloads folder and select the correct Factory Reset zip file compatible with your OS and OS Type. |
For Factory reset packages for older or discontinued devices, click HERE.
Factory reset packages for SD660 platform devices:
MC3300ax, EC30, EC50, EC55, ET51, ET56, L10A, MC2200, MC2700, MC3300x, MC3300xR, MC9300, TC21, TC21 HC, TC26, TC26 HC, TC52, TC52 HC, TC52x, TC52x HC, TC52ax, TC52ax HC, TC57, TC57x, TC72, TC77, TC8300 & WT6300 family of products.
To download the files, please search Downloads on this support page.
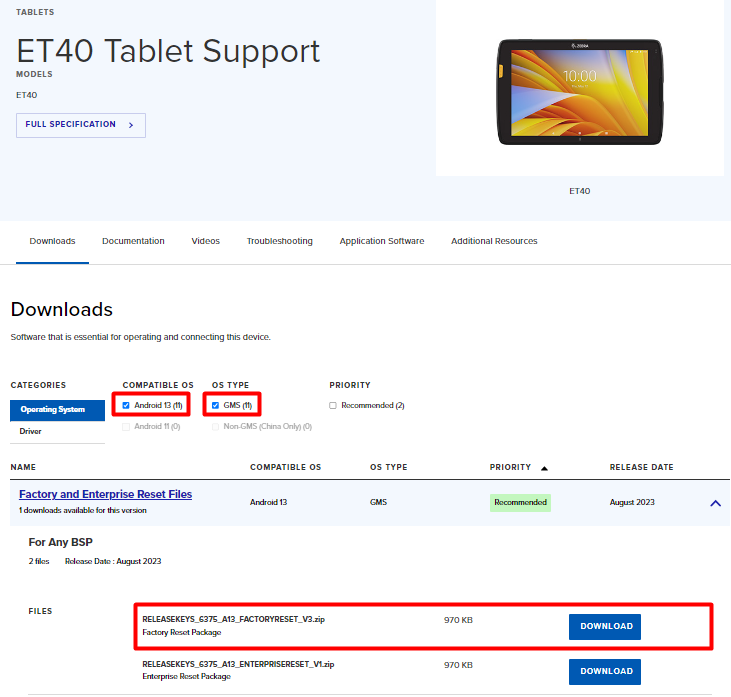
Navigate to Factory and Enterprise Reset Files > the Factory Reset zip file Download button.
The Compatible OS and OS Type are optional to filter download files.
Factory reset package for ET40 and ET45.
To download the files, see Downloads this support page.
Navigate to Factory and Enterprise Reset Files > the Factory Reset zip file Download button.
The Compatible OS and OS Type are optional to filter download files.
Factory reset package for KC50, TC22, TC27, TC53, TC58, TC73, TC78, ET60 and ET65.
To download the files, see Downloads on this support page.
Factory reset package for WS50:
To download the files, see Downloads on this support page.
Factory reset package for MC9400 and MC9450:
To download the files, see Downloads on this support page.
- Press the Enter key twice.
- After the factory reset is complete, the device-side message at the bottom reads Install from ADB complete. The device returns to the Android Recovery screen, where the Reboot system is now highlighted (selected).
- Reboot the device.
Now, you have successfully performed a factory reset.
Option 5: Using the External SD Card Method
|
NOTE: Refer to the device-specific product guide in Support and Downloads: Mobile Computers Support.
For example, the TC52x and TC57x Android 10 Product Reference Guide. Navigate to this chapter: Performing a System Update Using microSD Card.
The EC30 and WS50 do not have an SD card slot.
The TC8000, TC8300 slot is located under the back bezel held on by 6 Torx T8 screws
Older SM8956 platform devices (TC51/56 TC70x/75x MC33 TC8000) support a maximum SD card size of 32GB formatted as FAT or FAT32.
VC80x do not support microSD use USB Drive instead.
|
- Copy the Factory Reset zip file to the root of the microSD card.
- Copy the zip file to a microSD card using a host computer (see the USB Communication chapter from the PRG for more information) and install the microSD card into the device (see Replacing the microSD Card chapter from the PRG for more details).
- Connect the device with a microSD card installed on the host computer and copy the zip file to the microSD card. See the USB Communication chapter from the PRG for more information. Disconnect the device from the host computer.
- Restart the device.
- Press and hold the device-specific button or trigger. See the buttons based on your device below:
- EC50: PTT button.
- MC2200 and MC2700: P1 button.
- MC3300x and MC3300xR: Pistol Grip Trigger (GUN type) or the Right-Scan button (BRICK type). Refer to this article: Enter Android Recovery for Pistol Grip and Brick MC33 Devices.
- MC9300, MC9400 and MC9450: Pistol Grip Trigger.
- PS20: Insert the Terminal Reboot Tool (part number KT-MC18-REBOOT-05) into the power connector. Press and hold the Scan button until the display powers off (the device reboots). Refer to this article: PS20 - Enter Recovery Mode.
- TC20, TC21, TC22, TC25, TC26, TC27, TC5x, TC7x, ET60, ET65: PTT button.
- VC80x: + button.
- VC8300: Blue button.
- WT6000, WT6300 and WT6400: P1 button.
- ET40, ET45, ET51, ET56 and KC50: Volume Up (Vol+) button.
- ET60 and ET65: P3 button
- L10: Rotate Screen button (OREO) or Volume Up (Vol+) button (Android 10).
- CC600 and CC6000: Number 1 button. Refer to this article: CC600/CC6000: Enter Recovery Mode.
- WS50: Left button.
- The Android Recovery screen will display.
- To navigate to Apply upgrade from the SD card option, press the device-specific button or trigger:
- EC30, EC50, KC50, TC20, TC21, TC22, TC25, TC26, TC27, TC5x, TC7x,TC8000, TC8300, VC80x, ET51, ET56, L10, ET40, ET45, ET60 and ET65: Volume Up (Vol+) and Volume Down (Vol-) buttons.
- MC2200, MC2700, MC3300x, MC3300xR, MC9300, MC9400, MC9450 and VC8300: Up and Down arrow keys.
- PS20: Use touchscreen.
- WT6000 and WT6300: P1 and P2 buttons.
- CC600 and CC6000: Number 2 button.
- WS50: Left and Right buttons.
- You can just navigate to the Factory Reset file.
- Then, press the device-specific button to start the factory reset process.
- EC30, EC50, KC50, TC21, TC22, TC26, TC27, TC5x, TC7x, TC8000, TC8300, VC80x, ET51, ET56, L10, ET40, ET45, ET60 and ET65: The Power button.
- MC2200, MC2700, MC3300x, MC3300xR, MC9300, MC9400, MC9450 and VC8300: Enter button or Power button.
- PS20: Scan button.
- WT6000, WT6300 and WT6400: P3 button.
- CC600 and CC6000: Number 1 button.
- WS50: Press and hold the Left or Right button, then let go.
- After the factory reset, the device returns to the Android Recovery screen, where the Reboot system is highlighted (selected).
- Reboot the device.
Additional Information:
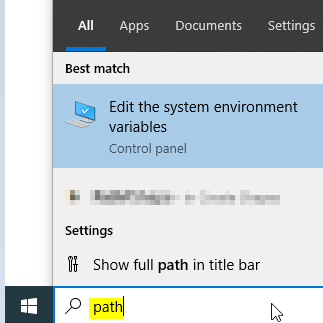
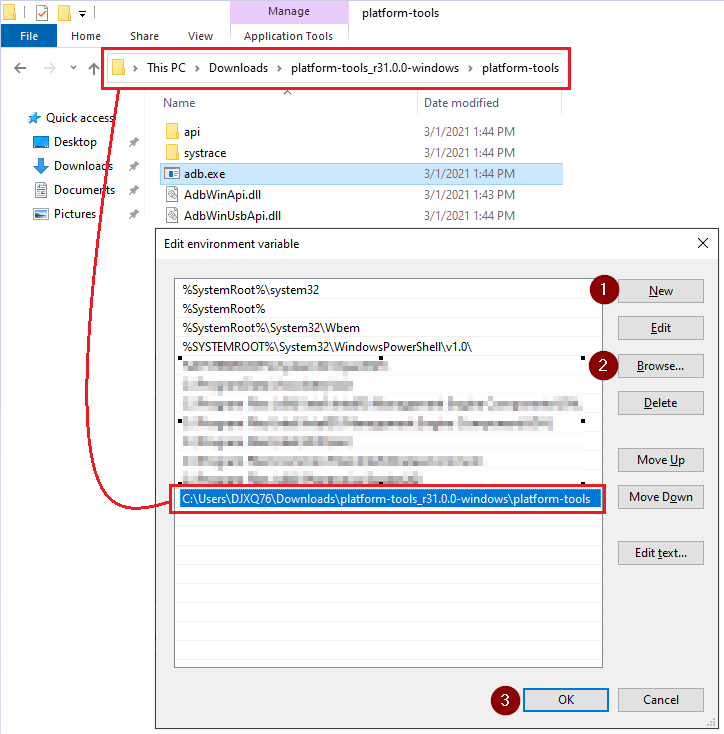
Edit the system path variable
- Type the path in the Windows 10 search box.
- Click Edit the system environment variables.
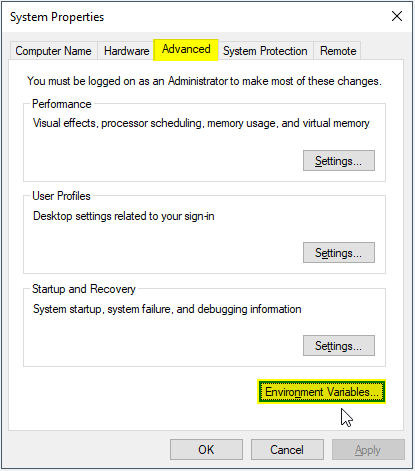
 - Under the Advanced tab, click Environment Variables.
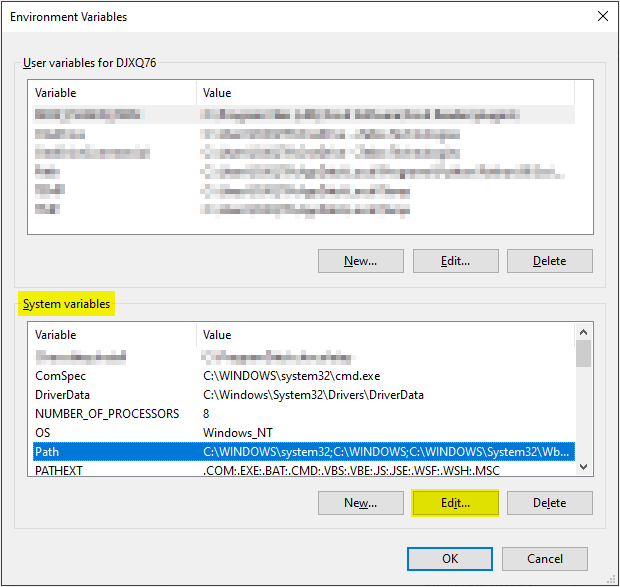
 - Select Path from the list of System variables, then click the Edit button.
 - Click the New button to create a new entry in the path, then click the Browse button to add the ADB folder.
- Click OK to close the editor, then close System Properties.
- Sign out and sign in again for this change to take effect.
Helpful Information:
|
|
|---|

