 | NOTE The printer can be configured using any number of applications, utilities, or a Zebra Printer Driver. If changes are needed for the printer settings, determine your application's method used to alter these settings.
For example: If you need to increase or decrease the darkness setting, you will need to determine if this action is performed on your driver, application, or both. Zebra provides utilities for printer setup (refer to Helpful Information below). Still, once you have established your application driver, software, or program, you will need to determine the methods used to modify the printer settings. |
Overview
Print quality is a product of proper printer setup and the use of compatible media for the application. The four impacting factors to consider are:
Media and Ribbon (if used) capabilitiesNot all media are the same when it comes to being compatible with your application or needs. Printing speed, the durability of the image or media, environment are just a few factors to consider when determining the printer setup for the application. Trying to compensate for poor media compatibility by using high printhead pressure and darkness settings can impact your printer’s printhead life.
Printhead PressureThere are no printhead pressure adjustments on the GX, GK and GC Series Printers.
Print SpeedThe printer is capable of printing at multiple print speeds. The speed selection considers the media or ribbon (if used) compatibilities since if high darkness settings are required to achieve good print, then slower rates should be used. If your application requires the highest print speeds, be sure your media supplier has recommended the correct media.
For example: To set the print speed using the ZDesigner Driver, follow these steps:
(Go to
Printing Preferences >
Options >
Print Speed).
For more information, refer to the
Configure or Modify Basic ZDesigner Driver Version 5 Settings.
Print DarknessPrint Darkness also referred to as (Density or Burn Temperature), is a user-adjustable setting. Avoid overheating the ribbon as it can melt if set too high. Try varying the darkness to produce the best print quality.
For example: To set the darkness using the ZDesigner Driver, follow these steps:
(Go to
Printing Preferences >
Options >
Darkness). For more information, refer to the
Configure or Modify Basic ZDesigner Driver Version 5 Settings.
 | IMPORTANT! All printer settings can be impacted by commands from a mismatched or misconfigured driver or software application. A printer functioning fine after setup but fails or indicates an error after label requests are received most likely affected by the host side misconfiguration of the driver or printer software settings. The host device that generates the printer commands for printing typically has a setup configuration that sends these as commands to the printer. Make sure all settings match the printer settings to avoid intermittent issues. |
Problems and Resolutions
|
Problem
|
Example
|
Resolution
|
Print is faded or too light when printing self-test
 | NOTE If the problem occurs after printing from your application, verify your driver/software configurations. |
 | NOTE : If there is a flood coating or preprint on the label surface where the print issue occurs, check with your supplier for corrective action. |
| 
|
- Increasing the Burn Temp.
- Media must be matched if the ribbon is used, applicable to (TLP2824 Plus Only), and if no ribbon is used, verify the quality of the Direct Thermal stock. Check with your media supplier if you have tried all suggestions without success.
- Verify the ribbon is not slipping due to improper loading. Look at the spent ribbon and observe the image is a negative of the printed image on the label. If it is shorter or compressed, see if the ribbon is sticking or if the ribbon core is not loaded correctly on the spindle.
- Ensure you have the correct power supply for your printer. Look at the label on the power supply.
- The platen or the retaining bearings may be worn, resulting in reduced printhead pressure. Consider your service options for platen and bearing replacement.
|
Print is faded or too light on the left or right side
Refer to Label Properties to view the left or right side of the label. | 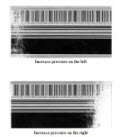
Click to Enlarge
|
- The printhead latch may not be closing properly. Verify both sides latch correctly.
- Check the platen roller for wear. If you use varying widths of labels, check to see if there is wear or compression in the narrower media area of the platen.
|
Barcode ANSI grade is low or won't scan
 | NOTE It is common to have the darkness set too high and cause bar spreading. This may look visually better, but it causes the spaces to be reduced, lowering the barcode grade. |
|  |
- Darkness is too high or low. Check the driver or application darkness settings.
- Verify your quiet zone is 10x the narrow bar width. Barcodes too close to the edge may not scan.
- Check for printhead element problems when printing the Pause test. Missing elements may create issues with the bars in the barcode. Print a configuration label (One Flash Feed Button) and look at the box around the text. It should be a solid line with no white stripes in the direction of travel.
|
| The print is smearing or rubbing off | 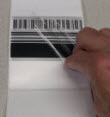
|
- Media and ribbon mismatch
- The ribbon ink will rub off the label if it is not matched for the media. Verify your ribbon and media are correctly matched for your application.
|
| The ribbon is wrinkling | 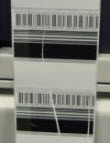
|
If the ribbon is wrinkling:
- Verify the printer ribbon is loaded correctly.
- Verify the media guides are appropriately adjusted to prevent horizontal wandering.
- Assure the printhead is correctly latched on both sides
|
| White lines in the print | 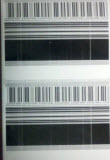
|
- Clean the printhead elements.
- The printhead element(s) may have failed, and the printer requires service.
|
The image is cut off on the right
Refer to Label Properties to view the left or right side of the label. | 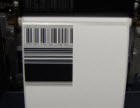
|
- Verify the PRINT WIDTH is set correctly in the Driver or application. This can also be set with the button flash method.
|
Helpful Information: Utilities and Drivers
Self-Test PrintA printer self-test label can be used to determine if the given print quality issue is seen from the printer itself and to test any changes made on the printer as you troubleshoot the problem.
Print a test label using the Feed Button method.
Refer to:
Printing a Test (Printer Configuration) Label.
Print Speed
The printer operates at the selected speed in inches/mm per second. That is because the print quality is affected by print speed, media, ribbon (if thermal transfer), and printer operating modes; it is essential to run tests for your application to choose the optimal print speed setting. Slowing the print speed can also help if the print is too light.DarknessThe darkness level can be set directly on the printer through the button flash method. Refer to the
User Guide: Feed Button Modes for more information.
Methods used to alter your print speed, and darkness vary based on your application:
Configuration LabelThe configuration label will let you view the current printer settings. Your printer supports two languages. (ZPL preferred) Use the method supported by your printer's language to see the printer configurations.
Feed Button Modes


