 | End Of Service Life (EOSL) Zebra no longer provide services or support for RZ400, RZ600 products. This knowledge article is for your reference only and is no longer proactively updated. |
1. Is the printer calibrated to your Label's length? The default of the RFID printers at Media Power Up and Head Close is Feed. On standard printers it is Calibration. Perform a Media and Ribbon Calibrate to ensure that the media is properly calibrated to the appropriate label length. Find it in the Front Panel LCD of the printer and it walks you thru step by step. This is the most vital step to correcting voids as if the calibrated label length is incorrect, the program position will be incorrect causing voids. Directions for media loading and calibration. Read More>>
2. Do your RFID Tags meet Zebra's Placement Specification? Check the Placement Specification for the Tag Type you are using. Read More>> Immediately peel the first two labels hanging out of the front printhead after media and ribbon calibration and run the RFID Tag Calibrate (this is more effective on tags 2” or shorter in length, but may work on longer tags **very inconsistent in effectiveness**). If this does not allow for proper program position to be set you may need to calculate the program position manually, see step three.
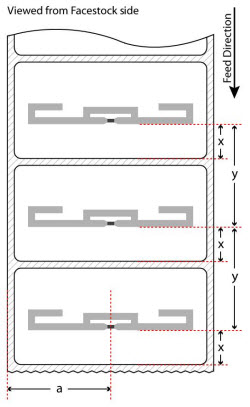
3. To calculate the program position manually, we need to first ensure that the tag meets the Inlay Placement Specification. Read More>> If it does not, the customer will have to contact the label vendor for specifications on the inlay (a,x,y, read and write powers), but we can’t guarantee it will function as it is not tested. See below for example:

Step One: Measure the distance from the beginning of the leading gap/mark to the beginning of the inlay (in millimeters).
Step Two: Subtract the measured distance from the provided tag guide line x value. Example: If the measured distance of the sample tag’s x value to the right is 5mm and the provided tag guideline for x is 13mm as above, then your equation would be 13-5=8, making your actual x value B8mm. If the actual measurement was 17mm and the guideline was 13mm, your equation would be 13-17=-4, making your actual x value F4mm.
**Hint: If your value is positive after the equation, then the ^RS command will have a B value. If the value is negative, then your ^RS command will have a F value.
Step Three: Create a program position command including your read and write powers from the tag guidelines. If we were using the guidelines from above and our actual x value is B8, the follow command needs to be sent to the printer to set the program position and read and write powers.
^XA
^RS,B8
^RW20,20
^JUS
^XZ
**This should set the proper read at write power as well the proper program position for the tag being used**
4. After this, send a known good tag format such as below. Ensure that there is no voiding and that only the tag quantity specified is printed/encoded.
^XA
^RS8,,,1
^RFW,H,,,^FD11111111^FS
^FO50,50^ADN,36,20^11111111^FS
^PQ1
^XZ
5 . While printing please make sure you keep the Media Cover closed. It keeps the dust out and prevents RF from being emitted.
6. If the steps above do not work, check to make sure the printer is at the current firmware level (Printer Firmware and Reader Firmware). Print a configuration label to check this, List Setup. Reader firmware is listed under RFID VERSION on the Config Label. New updates can be found at zebra website. Note: If reader firmware is not listed on the website no update is available or it has been built into the printer's firmware. Trouble installing the firmware for your printer? When installing firmware into your printer. PLEASE BE PATIENT. If you shut off the printer in the middle of the download the printer will not receive the entire application. After you download the Reader firmware you need cycle the power to the printer for 3 seconds.
7. Check Environment for Interference. External Reader/Antenna, Radio Waves, Electrical Power Cables, Cordless Phones etc.
If you have technical questions contact Technical Support. Read More>>

