 |
End Of Service Life (EOSL) ZebraDesigner versions 2.x have reached the end of service life. The license activation server associated with these products was retired on the 31st of December 2020. Starting 1st January 2021, licenses for this product can no longer be activated or deactivated, and Zebra can no longer perform license resets or transfers for these products. It is recommended you do not uninstall a working installation of any ZebraDesigner v2 edition. This knowledge article is for your reference only and is no longer proactively updated. See this article for information on replacement products: End Of Service For ZebraDesigner Version 2 Edition.
|
1. Design the Format in ZebraDesigner
Open up ZebraDesigner and create a new label. You will be asked to associate your newly created label with a printer.
Assuming that the ZebraDesigner driver is installed, select your printer.
For our example, we will proceed with an MZ 320 as our printer.
At this point, ZebraDesigner will ask for you to configure your label to your liking. This will include properties such as label margins, orientation, etc.
Once completed, you will have a blank canvas on which to draw.
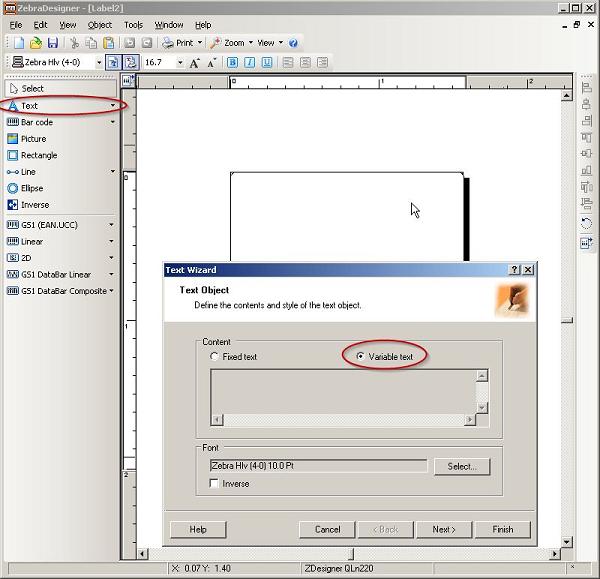
Insert a text field by clicking on the 'Text' option on the far left.
Use the text tool to draw a text field to the label, and when prompted, chose 'variable text' as the type:
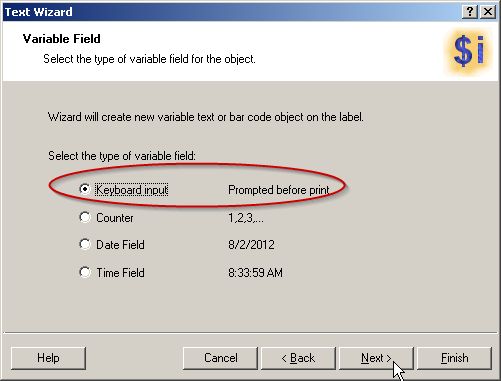
Select 'Keyboard input' and choose next.
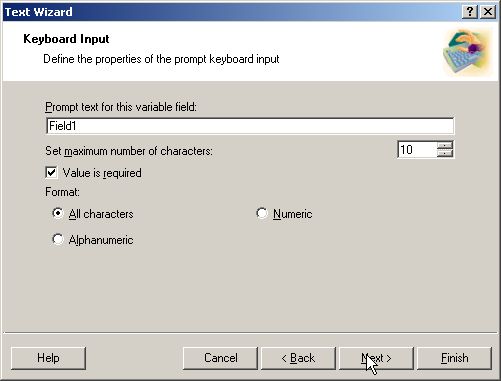
Give the field a name. For our example, we call it "Field1".
At this point, you can optionally include prefix or suffix data. For our sample, we will leave this blank and instead hit finish.
In this same manner, we create two more dynamic text fields on our canvas.
We also insert a static text field towards the top of our label that says "Test Label".
2. Save the template to the printer
First, we save the ZebraDesigner project to our computer. To do so, hit File > Save, and select a location and file name.
To save the template to the printer, simply choose the file menu and select 'Export to printer'.
This causes the label that we have designed to be stored to the printer's memory, making it available for recall later.
The format will be stored with the same name as the ZebraDesigner file name.
In our case, the format will be stored to our MZ 320 as "Label1.fmt' since our ZebraDesigner file is called "Label1',
3. Recall the template with printer language commands
Depending on your printer model, you may have to recall the format with ZPL or CPCL.
Here we demonstrate the means of recalling the label format for printing with both ZPL and CPCL.
We will use Zebra Setup Utilities, available for free on Zebra.com (see Helpful Information for download), to send the printer language commands.
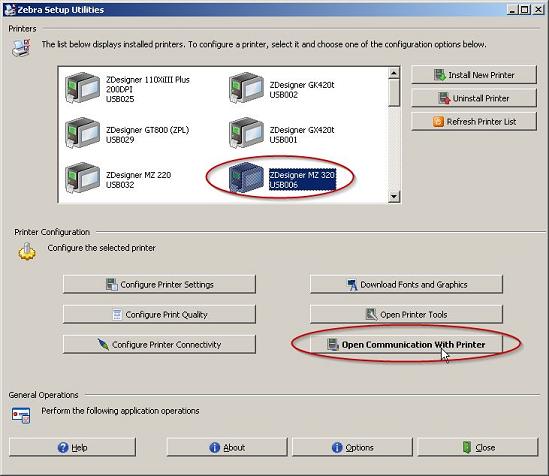
Open up Zebra Setup Utilities and select your printer. Next, select 'Open Communication With Printer':
We check to make sure that out format has been stored to the printer by sending the following command:
! U1 getvar "file.dir"
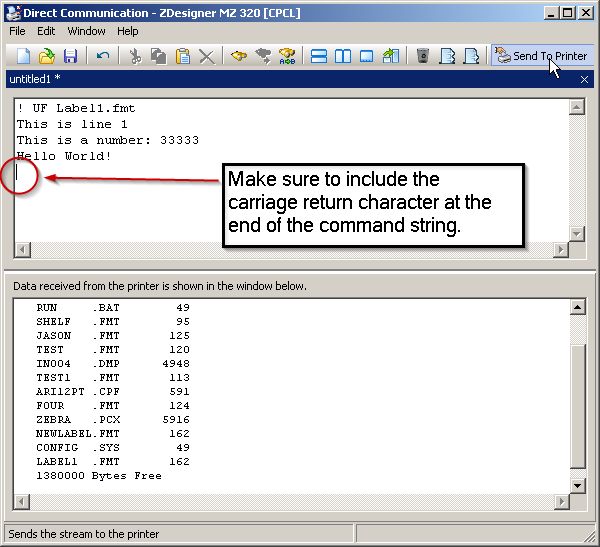
This command is case-sensitive and must end up with a carriage return. Click 'Send to printer" to see the files stored to our printer.
You should see a format corresponding to the file that you create in ZebraDesigner.
Now we can recall the format for printing by sending the following stream of data. For our example, send the following CPCL commands to the printer.
You can reference the CPCL commands in the CPCL manual, which is available here: Read More>>
If you are using a ZPL printer, you can alternatively use the following ZPL to recall the format:
^XA
^XFE:LABEL1.ZPL^FS
^FN11^FDThis is line 1^FS
^FN12^FDThis is a number: 333333^FS
^FN13^FDHello World!^FS
^XZ
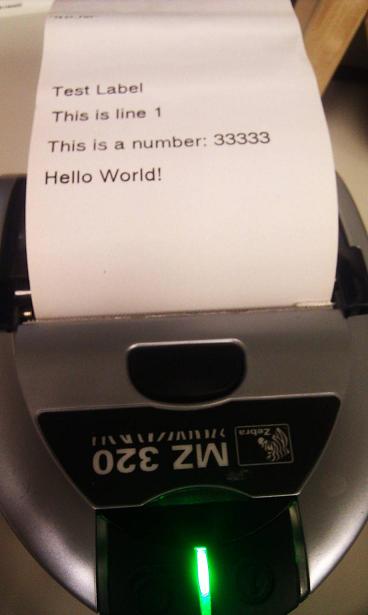
Sending the CPCL or ZPL commands should result in a valid print-out, with the sent printer language data populating the label:
For further details, refer to ZebraDesigner Pro ‐ Store label template and recall for printing.
Helpful Information:


