 | End Of Service Life (EOSL) Zebra no longer provide services or support for ZM400 and ZM600 products. This knowledge article is for your reference only and is no longer proactively updated.
For more details, refer to Discontinued Printers. If you are interested to upgrade your products, Contact Zebra. |
Colored ribbons such as red, green, blue as well as other colors tend to be more transparent then black ribbons. As a result the ribbon sensors in the printer can have a difficult time sensing that the ribbon is present. In normal operation the printer should be able to recognize both conditions:
Trying to manually adjust ribbon sensor levels through the LCD does not always produce consistent reliable detection from one printer to the next when using colored ribbons.
This procedure is meant to provide a reliable alternative method for detecting the conditions mentioned above when using colored ribbons.
This procedure will only work if the roll of ribbon being used has a silver reflective trailer at the end of the roll. Read More>> The silver trailer is used to detect the ribbon out condition. Most rolls of colored ribbon have a silver trailer at the end of the roll.
Procedure:
- Turn off the printer power.
- Open the printhead.
- Remove the ribbon completely.
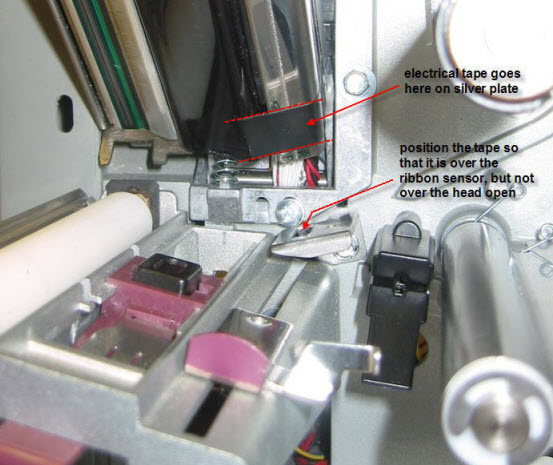
- Place electrical tape on the ribbon sensor reflective surface.
- Note: Please ensure the tape is positioned above the Ribbon Sensor portion of the Reflector Plate and not the Head Open Sensor.
- There should be a small area exposed on the inboard side of the Reflective Plate for the Head Open Sensor to use for reflecting its light, see sensor diagram below. If the Head Open Sensor Reflector Plate is covered, the printer won't respond with a Head Open Error when the printhead is opened.

Here is a close up of the sensors viewed from the front of the printer.

- Power on the Printer.
- Select Media and Ribbon: Calibrate on the LCD printer.
- Press SELECT to select the parameter, then press PLUS (+) to start calibration. The LOAD BACKING prompt displays.
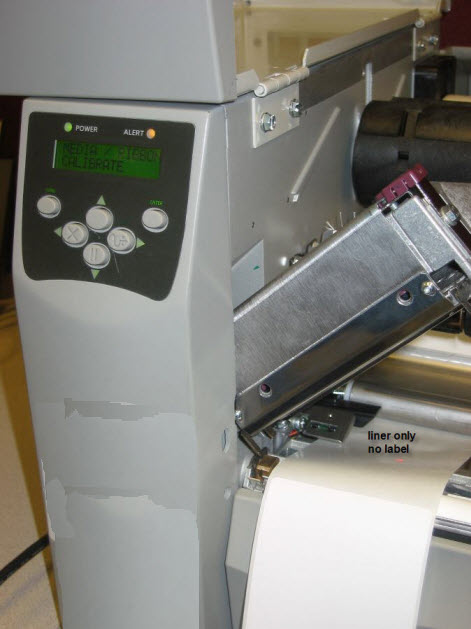
- Open the printhead and remove labels from backing.
- Remove approximately 8 in. (203 mm) of labels from the backing, and pull the media into the printer so that only the backing is between the media sensors.

Z4MPlus Printer Shown
- Leave the printhead open. Then, press PLUS (+) to continue. The REMOVE RIBBON prompt displays.
- Remove the ribbon (if used). Then, close the printhead.
- Press PLUS (+) to continue.
- The message CALIBRATING PLEASE WAIT displays.
- The printer adjusts the scale (gain) of the signals that it receives from the media and ribbon sensors based on the specific media and ribbon combination being used.
- On the sensor profile, this essentially corresponds to moving the peak of the graph up or down to optimize the readings for your application. When calibration is complete, RELOAD ALL displays.
- Open the printhead and pull the media forward until a label is positioned under the media sensor.
- Reload the ribbon (if used). Then, close the printhead.
- Press PLUS (+) to continue.
- The printer performs an auto-calibration. During this process, the printer checks the readings for the media and ribbon based on the new scale established, determines the label length, and determines the print mode.
- To see the new readings on the new scale, print a sensor profile.
- Press SELECT to accept any changes and deselect the parameter.
- Open the printhead, load the colored ribbon, close the printhead and take the printer out of pause state by hitting the PAUSE button. The printer will feed few labels and calibrate and finish with display reading PRINTER READY.
- When the roll of ribbon runs out by reaching the silver trailer the printer should trigger a RIBBON OUT error.


